Processing a Digital Image – Rev. 04.09
Best Practices
1. Transfer original JPEG (.jpg ) or RAW camera file to hard drive of your choice
via USB or Firewire – directly from the camera or with a card reader.
2. Sort, Select and Process (if shooting RAW) within Adobe Bridge
3. Open JPEGs requiring adjustment in Adobe Photoshop.
3a. Duplicate background layer maybe used as mask for sharpening or other last minute effects.
3b. Apply all corrections/modifications as “adjustment layers” or convert to smart object layers requiring effects.
Luminance – Levels
Color – Curves
Grayscale – Channel Mixer
Sharpening – Unsharp Mask applied to Duplicate Background Layer
Optional workflow would be followed to process the jpeg through camera raw plugin.
4. Saving Working copy of file as Photoshop File Format (.PSD) or .TIFF (without compression and maintaining layers)
----------------------------------------------------------------------------------------
Preparing the working copy for Print
Color working space should be configured to Adobe RGB 1998 prior to opening files for print. (Select North American Prepress 2 under Color Settings.)
1. Open working copy of the file and apply any adjustments required prior to scaling resolution to appropriate dimension for the final print (as described above).
2. Convert Resolution to appropriate print dimensions with Resample OFF
alternately, using the crop tool with print dimensions specified crop to a size down sampled (be cautious on any upsampling / moderately -ok )
3. Sharpening – Unsharp mask applied as final step prior to printing
(*Unsharp Mask applied to Duplicate Background Layer)
4. Depending on the size and complexity of the file an optional final step prior to sending to printer is to flatten all layers.
(*Do not overwrite your working file in the flattened state!)
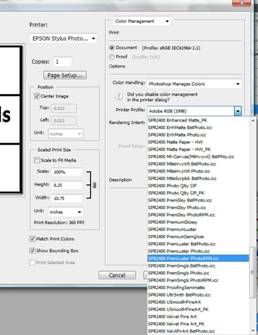
5. Adobe Photoshop File Menu - Select Print
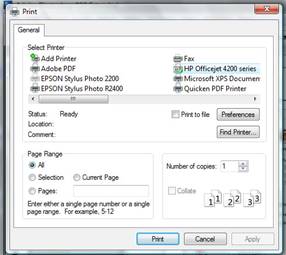
6. Click on Page Setup – Select Printer (selecting the printer enables the advanced paper preferences including borderless printing), Paper Size and Orientation – Select Ok
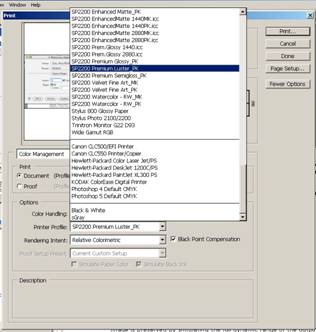
7. Printer Profile Selection– choose Profile for specific printer and paper.
The primary difference with regard to an Epson print using a printer profile is the selection, installation and application of a paper profile specific to the paper and printer combination.
In the initial color management menu under Print with Preview – Select the Printer Profile provided by the manufacturer of the paper you have chosen for this specific printer. All other color management options will be turned off in a later menu.
8. Rendering Intent – Relative Colormetric (–optional Perceptual), Black Point Compensation – checked
A rendering intent determines how a color management system handles color conversion from one color space to another. Different rendering intents use different rules to determine how the source colors are adjusted; for example, colors that fall inside the destination gamut may remain unchanged, or they may be adjusted to preserve the original range of visual relationships when translated to a smaller destination gamut. The result of choosing a rendering intent depends on the graphical content of documents and on the profiles used to specify color spaces. Some profiles produce identical results for different rendering intents.
In general, it is best to use the default rendering intent for the selected color setting, which has been tested by Adobe Systems to meet industry standards. For example, if you choose a color setting for North America or Europe, the default rendering intent is Relative Colorimetric. If you choose a color setting for Japan, the default rendering intent is Perceptual.
You can select a rendering intent when you set color conversion options for the color management system, soft-proof colors, and print artwork:
Perceptual Aims to preserve the visual relationship between colors so it’s perceived as natural to the human eye, even though the color values themselves may change. This intent is suitable for photographic images with lots of out-of-gamut colors. This is the standard rendering intent for the Japanese printing industry.
Saturation Tries to produce vivid colors in an image at the expense of color accuracy. This rendering intent is suitable for business graphics like graphs or charts, where bright saturated colors are more important than the exact relationship between colors.
Relative Colorimetric Compares the extreme highlight of the source color space to that of the destination color space and shifts all colors accordingly. Out-of-gamut colors are shifted to the closest reproducible color in the destination color space. Relative colorimetric preserves more of the original colors in an image than Perceptual. This is the standard rendering intent for printing in North America and Europe
Absolute Colorimetric Leaves colors that fall inside the destination gamut unchanged. Out of gamut colors are clipped. No scaling of colors to destination white point is performed. This intent aims to maintain color accuracy at the expense of preserving relationships between colors and is suitable for proofing to simulate the output of a particular device. This intent is particularly useful for previewing how paper color affects printed colors.
Black Point Compensation Ensures that the shadow detail in the image is preserved by simulating the full dynamic range of the output device. Select this option if you plan to use black point compensation when printing (which is recommended in most situations).
10. Select Print – From this step forward we are working within the Epson print driver menu.
There are two screens of importance: Print Settings and Color Management both are accessed from with the Epson print driver menu prior to finally sending the file to print.
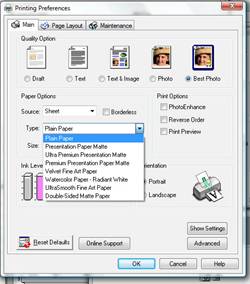
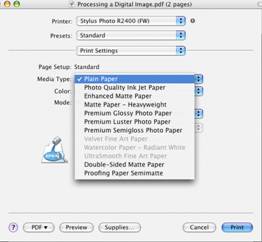
10.1 Print Settings - within the Print Settings menu (below)
- set the appropriate paper surface or media type.
Select the Advanced option to continue:
- Ink Use Color or Black only *grayscale
- Resolution:
Photo (1440x720)
Best Photo (1440x1440)
Photo RPM (5769x1440)
- High Speed - ON
- Gloss Optimizer – OFF
10.2 – Color Management – Select Color Management OFF. All Color Management/calibration adjustments are contained in the ICC Profile selected from Print with Preview menu. If you are unsure of having selected the proper profile return Cancel the print and return to Print with Preview to reselect.
Finally, select PRINT.
You will be prompted one final time regarding Postscript on a non-postscript printer. Select OK and proceed.
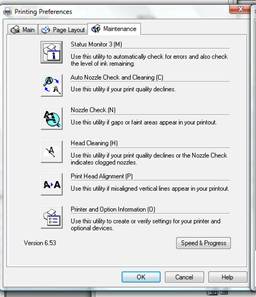
Utilities to remedy substandard printing results – caution – head cleaning uses quite a bit of ink. (I’ve heard 4 ml per…_)